Sunday, July 27, 2008

shirt pattern, review

A fabric that I've had for several months finall y got made into a shirt, it turned out to be a handsome shirt but I'm not so sure about the pattern.
I bought a new shirt pattern on-line which looked pretty nice, it was not inexpensive at $19.95 but I thought, hey, it says industry techniques etc. from Islander sewing patterns. This pattern is definitely not for beginners, and even people who know a thing or two about shirt making are going to find some of the instructions a little unclear, but, you can always spend even more money buying the videos that will clarify it for you. The inset pocket, as one example, is made of two pieces of fabric, one a 1/4 inch longer than the other. Nowhere in the instructions is it mentioned which piece to use where, I made a guess, it turned out to be a good guess. a nice feature but an example of the the poorly written instructions. Nancy Pray, the designer of the pattern does include a tip, buy the video.
Another example is the front shirt yokes, there is a right and a left, both pieces of pattern say to cut two. There is no mention of what to do with the second piece. I really like the trick they use for attaching the front yokes to the back yokes, and it was explained well enough for me to follow, but again, if you don't understand you can spend more than the almost 20 bucks you already spent for the pattern and buy the video. i totally did not understand the instructions for attaching the collar and collar stand, but luckily had enough experience with shirt making to do something that also worked, which at that point was very difficult, but doable. If only I'd spent the extra money for the video, I'm sure it would have been very easy.
Luckily, I made a short sleeve shirt this first time, or I'd have had deal with the cuff attaching incomplete instructions, unless of course, I'd bought the video.
In short, it's a nice looking shirt. The Pattern is way overpriced for the the quality of instructions that come with it, and seems to be intentionally vague in order to get people to buy the videos.


Wednesday, July 23, 2008

Knäule....

... die ich an niemand wünschen würde. Guckt Mal was das schönste puppy der welt hat mir angetan, ob ich es wieder recht machen kann weiss ich noch nicht.

Tangles that I wouldn't wish on anyone. Just look at what the most beautiful puppy in the world has done to me. If I can ever make it right again, I just don't know.

Tuesday, July 15, 2008

Fabric

Haben alle die neue Stoff von Etsuko fabrics gesehen? Hier mein lieblings Muster, ja, das sind Streifen. Von Hier erhaltbar.

Has everyone seen the new fabrics from Etsuko? This is my favorite print, yes it's stripes, which you can purchase here.
Auch nicht zu verpassen, Reprodepot.
Don't miss the great fabrics Reprodepot.

Thursday, July 10, 2008

felted animals/ gefilzte Tiere

A good tip from Faserfimmel. A new book from Brigitte Krag-Hansen. Animal Felt, nature true felted animals, also available in German.


Eine gute Hinweise von Faserfimmel.
Ein neues Buch von Brigitte Krag_Hansen. Tiere naturgetreu filzen,
schaut Mal Hier um zu sehen wo es erhaltbar auf Deutsch ist.

Sunday, July 6, 2008

another way to use fibers...

First approach to draft text in english... I hope, you are generous, my english is infernal...


Today I started a new attempt to finish my puppets.
I began to work with a clot of squashy pulp and modeled heads, hands and a pair of feet. They had to dry off about two weeks, than I polished and had to prime the material, meantime it's colored and finished.


'Harm', my hands down favorite, is an East Frisian farmer who always is smoking.
His motto: "Kopf hoch, auch wenn der Hals dreckig ist!" ("Head up, even the neck is dirty though...")

Fietje, his little son is very streetwise.

Last but not least, there is Don Peperoni, Sicilian..., known for best Pasta, Pizza, Gelati and Co... .
His German Language is as horrible as my English
___________
Oha, ich fürchte, Englisch kann ganz schön hart sein...
Das ausgehärtete Material ist es übrigens auch, es hat etwa die Festigkeit von Hartholz und lässt sich auch so bearbeiten.
Eben Holzköpfe.

Friday, July 4, 2008

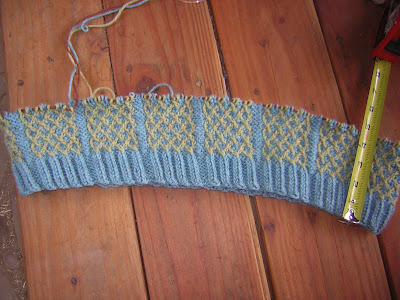
Part Two, the vest.

Part 1

It already weighs 100 grams and is only 1/7 finished. I think I better get some more yarn. It's a very dense not very elastic fabric.

Es wiegt schon 100gm und ist nur 1/7 fertig. ich denk ich soll ja mehr Garn kaufen. Es ergibt ein dickes nicht sehr dehnbares Stoff.

Click on photos to enlarge
A closer view. Eine näher Ansicht.
And just so you all know who the most beautiful dog in the world is, Maisie.
Und so das Ihr wisset wer ist die Hund am schönsten in dem ganzen Welt, Maisie.


Wednesday, July 2, 2008

Planning a Vest/ Eine Weste plannen

After doing this sample I decided to go ahead and knit up a vest. Here's the basic plan. This can be worked in any yarn on any size needles, just do a test swatch and then do the math to get your numbers. I'm using Cascade 220 and U.S. #8/5mm needles.
NOTE: All knit stitches are worked through the back loop to form a twisted stitch that stands out from the background.

Click Photo to enlarge


The pattern is 18 stitches wide so our 100% number has to be divisible by 18.
As we can see in the sample, a standard ribbing is not going to flow nicely in to the pattern stitches of the body, so we need to adapt our ribbing. In this case we want to begin our ribbing with purl 2 and follow the knit and purl stitch pattern of the body. As to the 90% cast on number, this will also mess up the flow from ribbing to body pattern. There is a space of 2 purl stitches between each of the pattern sets, this is the only place where we can increase without affecting the flow so our cast on number will be a multiple of 17 and we'll do an increase between the panels of pattern. In this case I cast on 238 stitches. the ribbing is then Purl 2, *Knit 2, P2, for the next 14 stitches ending with a knit 2, Purl 3 and repeat from * to end of round ending with a Purl 1. Work the ribbing to desired width incorporating the second color in the last row of the ribbing in each of the Knit 2 slots, and working an increase stitch into the center of each of the Purl 3 slots. Begin the chart and knit until you have the desired body length. body length can be determined by measuring the distance between the bottom and armhole of a favorite garment.

Next; we'll talk about beginning the armhole steeks, but first I have to knit the body of my sweater so it may be a while.

P.s. How much yarn will be needed? I'm not sure. This sweater used 800 grams. I have 400 grams of the main color and 250 grams of the secondary color, I'm crossing my fingers and hoping it's enough.
Part 2