Showing posts with label woodworking. Show all posts

Saturday, July 31, 2010

Out with the old.

The complaint was that this old wooden clothes drying rack was staining the white t-shirts and underwear. I'm not surprised, it has been around collecting dust and grime for years.
I was going to just build a new based on the old one but looked around and found these plans.
The wood dimensions seemed a bit flimsy to me though. I used 5/8" dowels and 3/4x1 1/2" supports. I also decided to not go to the all the trouble of shouldering the dowels and just did everything with 5/8" holes. I figure that if the supports slide along the dowels too much I can always pin them with 1/4 pegs later. I also used 4' rather than 3 foot dowels.
It was a little tricky getting all the parts in the right places. But I finally got it right.
Now I have a fresh new and much roomier drying rack for the laundry room.
I just need to wash some laundry now, hang it to dry instead of using the machine, and watch those energy savings pile up.


Sunday, July 25, 2010

After weeks of sulking...

...because I was told that my projects were too messy to be worked on out in the garden because it made it too embarrassing to have freinds over, I finally went in to the woodshop and began a project. I have been using a chair piled with pillows and folded up blankets to sit on while weaving. It's time to actually build a taller chair. This chair will be based more on the welsh stick chair, images, instructions for the adventurous, than a windsor chair, the style just suits me, personally better.
Several weeks ago I went to the log yard and picked up some elm that Joolz had set aside for me.
He harvests trees in Portland, mills them and resells them to be used for building projects. Yet another Portland "green" company, and totally to my liking.
He also had a nice piece of oak cut off that I also took thinking it might be nice for making crest rails. I unloaded it off the top of the car and split it out on the sidewalk.
Today I used the draw knife and shaving horse to rough out the legs. It's definitely not as nice as working on the shaving horse out in the garden, but it's an age old tradition to suffer for one's art;-D
The seat will be some 26"/66cm above the floor, a good 9"/23cm higher than most chairs. I've already determined that I would like the leg tenons to be a full inch/3cm in diameter where they pierce the seat instead of the 5/8" /1.6cm of the previous 2 chairs, chair 1, chair 2. This means that I will need a new tenon shaver as well. Based on my Elia Bizzarri tenon rounder and using a scrap of maple from building the face plate for my bench vise,( for some reason I never did translate that particular entry into english, if you don't do german, just enjoy the pictures). The blade will be a Kunz spokeshave blade. I'll let you know how it turns out. Using a taper reamer in maple is a bit of a task, but didn't take as long as I feared.
More later as progress warrants.

Sunday, June 27, 2010

I have actually been doing stuff, even though I have not been posting.

I finally used up all the warp that I had wound onto the loom. I had a lot of problems though with the warp tension going more and more uneven as I progressed. Rather than saying that it was the inexperienced weavers fault, I decided that the 90 year old worn out loom parts were to blame and decided to replace this particular piece. The sectional warping beam.
I did not want to pay the price for Maple as was probably used for the original, so I bought Poplar. Milled it to size and nailed and glued it up.
I really wanted to do something more like the metal section dividers of the Lerclerc loom, but could not find anything readily available to make that happen, something along the lines of a large stainless steel fence staple.
I decided to go along with the original design until I find what I would rather have, retrofitting shouldn't be too much of a problem. So, 3/8" dowel sharpened in the pencil sharpener and then cut to length, x76. When was the last tiome one of you sharpened 76 pencils in a row?
A light sanding with 22o grit sandpaper, x 76.
And now it's time to quit and drink beer for the rest of the evening.
I did contact Clayton Boyer though, an incredible designer and builder of wooden gear clocks.
His wife is a fiber artist and he has designed some items for her. I challenged him to design plans for a specific piece that I would dearly love to have, but don't have the mechanical abilities necessary to design myself. A geared device that can twist 2 strands of rags together and, in the same operation, with the use of only one crank, then wind it into a ball. We'll see if he can come up with such a plan. If anyone can, it's him. He's a wooden gear and device genius.
That then leaves me with the question; "can I follow his plans"?

Saturday, May 15, 2010

The wood is starting to tell me...

... What kind of a chair it wants to be. It turns out that it wants to be a bit different than what I had in mind for it. It wants to be more rustic and natural. Maybe not THIS rustic, but definitely not refined. Looks like I'll need to go out and find a more appropriate piece of seat wood than what I have on hand.
Der Holz fingt an, mir zu erzählen was für ein Stuhl er will werden. Nicht genau was ich plannte, eher primitiv und natur gemass. Da muss ich jetzt ein Sitzbrett aussuchen der mehr geeignet ist als was ich schon habe.
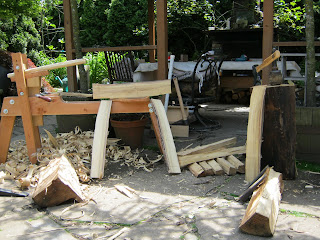

The black locust tree was cut down last year and is truthfully now too dry for this technique, but I can still work with it. It is also more knotty than is preferred. My wood guy and I are just getting to know one another though and he seems to have an understanding of what I'm doing and should be able to supply me with wood more suited to my needs in the future, which reminds me, he was looking at felling an Elm last week, I need to call him.

Das Blacklocustbaum war im vergangene Jahr gefällt und wirklich ist schon zu ausgetrocknet für dies Technik aber ich kann noch damit was anfangen. Er ist auch knotiger als gemöcht. Mein Holzmann und ich aber nur angefangen haben uns zu kennen, er schaint aber zu verstehen was ich tue und soll zukunftiger mir ausstatten können mit was ich brauche. Da erinnere ich, er hat ein Ulm angeschaut dass er fallen würde, ich muss ihm anrufen.

(click on any image to enlarge it)

I have the two arms and crest rail roughed out. I really want to keep the rustic edge of darker wood even though I know it isn't really very sound wood, but then I'm not an expert chairmaker and am allowed to do things "wrong". (can you see the mischevious smile of the creative rather than technique oriented guy?)
Die 2 Armlehne und der Gipfelkamm sind schon grob entworfen. Ich will den dunkler Holz am Randen haben, auch wenn ich weiss das er nicht genau vernünftig ist. Ich bin aber kein Expert und kann was "falsch" tun. (könnt ihr der schelmischer Lächeln der eher kreativ als techniker Mann hier sehen?)
I have also built a rooting frame for rooting cuttings from various trees and shrubs from around the garden. Hopefully some of the cuttings will strike and turn into potential material for future bonsai. It's an old cement mixing trough that had gotten holes in it. I built up a wooden frame on top of it and have an old window over it to create a kind of mini greenhouse.

Ich habe auch ein Minipflanzhaus gebaut worin ich hoffe die Abschneidungen von Bäumer und Buschen Wurzeln zu schlagen würden. Die würden zukunftiger potenzial Bonsai werden.


Sunday, May 9, 2010

What's up Lars?

Yesterday Geoff and I went to the annual Bonsai exhibit at the Portland Japanese gardens.

I've been collecting some tree and shrub seedlings from around our garden. maybe some day a couple of them will have the potential to become Bonsai.
Meanwhile I've knocked together some old scrap wood into molds for making some paper/cement training pots.
I'll do a post later on the pots.

I've also got my log soaking to keep it wet until I start making chair parts.
And I'm warming up the soil to get ready tp put in the tomatoes.
I've almost used up the warp I have on the loom and will soon be able to wind on a new one, one which will hopefully be evenly tensioned across the loom.

It's spring you know, it's time to get involved with as many projects as possible;D

Wednesday, May 5, 2010

wood fibers

It's spring, it will soon be time to hang out in the yard after work and on weekends. Naturally any red blooded guys thoughts turn to woodworking at this time of year. I went to a local wood yard this morning and came away with a chunk of black locust wood.

Let's see how it splits out.

This is a selection of similar versions of my goal.
I'll let you all know how it goes.

Sunday, March 28, 2010

Back to the drawing board.

After attempting to warp on following the original instructions, from some 80 years ago, as well as missing some loom parts and having to guess at what they might look like, I ended with tangled and broken threads. I decided to do some more thinking and visited my friend the internet. There I found that most people with a sectional warp beam loom use a detached spool rack and a warp tensioning box. Okay. Into the woodshop to see what scraps I had on hand to come up with these items. Voila...
The woodshop is getting low on scraps but I managed to find the pieces to come up with a spool rack, of course I had to dismantle my original home built loom to use it's leg assembly. I had an assortment of wood doweling, and some T-pins. The base of the tensioning box is oak and the side piece is poplar. The idea is that the warp threads come into the box through 1 set of pins and wrap over and under the dowels in a series that adds the right amount of tension, they then feed out through another set of pins and on to the warp beam in the right order.
It seems to be working.
The overview of this set up from the back of the loom.

Now, I need to finish winding on and thread the heddles and sley the reed so I can get on with some weaving.

Friday, March 26, 2010

2 problems solved, on to the next one

Okay, i've built and attached the new treadle brace/ spool rack.
The next problem was how to control the threads as they come off the spools. The original loom would have had a wire with multiple loops bent in several different directions. No clear picture of how it should have looked, and a later edition of the instruction manual stated that the newer versions of this loom were equipped with" a thin board with wire staples". Okay, what? My solution, a board with eye hooks. I don't know yet if it is a good solution. I have to solve the next problem before I know how this solution works.


Wednesday, March 24, 2010

Loom repair

The part of the loom that I was sure I would have to replace sooner rather than later did break soon.
I can't afford a nice piece of maple to make the part I need so I took a few pieces of old pallet wood from work and made do. As you can see, the original would have also had some holes where "spindles" would have been inserted. These hold the spools of warp thread while you wind on the warp. since my wood is a soft wood, rather than a hard wood, I made the piece thicker than the original.And, since it was such a nice evening out in the garden, I went out there to do part of the work.
Power tools do help speed up the woodworking, but the old handtools are very pleasant to use. No noise, and,well... they are hand tools.
The new piece is shaping up nicely, but that is definitely enough for today. Piggy and dog also want some attention as well.


Monday, March 22, 2010

Got shuttles?

I had 2 shuttles that I made from a piece of cedar, this next project will require more than that.
Tablesaw,
Drill press,
Band saw,
dremel and sander.
Okay, I've got shuttles; the 2 cedar, 2 oak,3 poplar and 9 makore. It's a good thing that save all my scraps of lumber.